JLOG
[안드로이드 스튜디오 강좌 #16] 토스트, 스낵바, 대화상자 - 스낵바, 대화상자 본문
이전강의에 이어서 진행합니다.
[안드로이드 스튜디오 강좌 #16] 토스트, 스낵바, 대화상자 - 토스트(Toast)
! 목표
아래에서 올라와서 간단한 메세지를 나타내주는 스낵바와 사용자에게 확인을 받거나 간단한 선택을 받기 위한 대화상자에 대해서 알아보자
1. 스낵바 보여주기
간단한 메세지를 보여줄 때 토스트 대신 스낵바를 사용하는 경우가 많다.
스낵바는 외부 라이브러리로 추가되었기 때문에 스낵바가 들어있는 디자인 라이브러리를 프로젝트에 추가해야 사용할 수 있다.
[안드로이드 스튜디오 강좌 #16] 토스트, 스낵바, 대화상자 - 토스트(Toast) 강좌에 이어서 진행한다.
*외부 라이브러리 추가하는 법
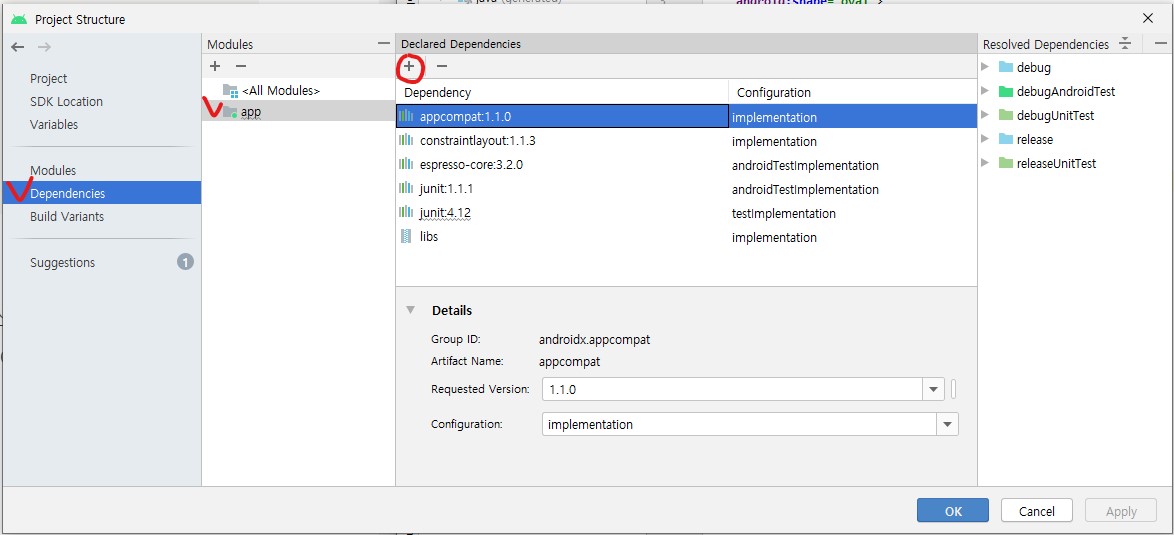
안드로이드 스튜디오 상단에 [File-Project Structure..]를 클릭
대화 상자가 보이면 왼쪽 [dependence] - [app] 항목을 선택해 + 버튼을 누른후 Library dependency 메뉴를 선택한다.

라이브러리 항목들이 보이면 com.android.support:design 항목을 찾아 선택 후 [OK] 버튼을 누른다.

프로젝트 창으로 되돌아 온후 activity_main.xml 파일에 새로운 버튼을 하나 더 추가하고 '스낵바 띄우기'라는 글자가 보이도록 코드를 수정하자.
onClick 속성에 onButton3Clicked 메서드가 호출되도록 onClick 속성을 추가하자.
MainActivity.java에 하단과 같이 onButton3Clicked() 메서드를 추가하자.
public void onButton3Clicked(View v){
        Snackbar.make(v, "스낵바입니다", Snackbar.LENGTH_LONG).show();
    }
실행시켜 확인해보면, 화면 아래쪽에서 메세지가 올라가는 스낵바를 확인할 수 있다.

2. 알림 대화상자 보여주기
알림 대화상자는 사용자에게 확인을 받거나 선택하게 할 때 사용한다. 사용자의 응답을 받기 보단 메세지를 전달하는 역할을 주로 하며 '예', '아니오'와 같은 전형적인 응답을 처리한다.
-실습
새로운 SampleDialog 프로젝트를 생성하고
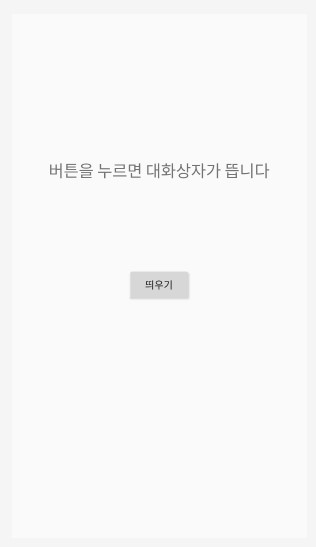
activity_main.xml 파일에 텍스트뷰 하나와 버튼 하나를 추가해 보자
텍스트뷰의 text 속성에 '버튼을 누르면 대화상자가 뜹니다'를 입력해주고, 글자 크기를 25sp 로 설정한다.
버튼 text 속성에는 '띄우기'라는 글자가 보이도록 한다.

-XML 코드
<?xml version="1.0" encoding="utf-8"?>
<androidx.constraintlayout.widget.ConstraintLayout xmlns:android="http://schemas.android.com/apk/res/android"
    xmlns:app="http://schemas.android.com/apk/res-auto"
    xmlns:tools="http://schemas.android.com/tools"
    android:layout_width="match_parent"
    android:layout_height="match_parent"
    tools:context=".MainActivity">

    <TextView
        android:id="@+id/textView"
        android:layout_width="wrap_content"
        android:layout_height="wrap_content"
        android:text="버튼을 누르면 대화상자가 뜹니다"
        android:textSize="23sp"
        app:layout_constraintBottom_toBottomOf="parent"
        app:layout_constraintEnd_toEndOf="parent"
        app:layout_constraintHorizontal_bias="0.495"
        app:layout_constraintLeft_toLeftOf="parent"
        app:layout_constraintRight_toRightOf="parent"
        app:layout_constraintStart_toStartOf="parent"
        app:layout_constraintTop_toTopOf="parent"
        app:layout_constraintVertical_bias="0.29" />

    <Button
        android:id="@+id/button"
        android:layout_width="wrap_content"
        android:layout_height="wrap_content"
        android:layout_marginTop="120dp"
        android:text="띄우기"
        app:layout_constraintEnd_toEndOf="parent"
        app:layout_constraintHorizontal_bias="0.498"
        app:layout_constraintStart_toStartOf="parent"
        app:layout_constraintTop_toBottomOf="@+id/textView" />

</androidx.constraintlayout.widget.ConstraintLayout>
이제 버튼을 눌렀을 때 대화상자가 보이게 하기 위해서,
package org.techtowm.sampledialog;

import androidx.appcompat.app.AlertDialog;
import androidx.appcompat.app.AppCompatActivity;

import android.content.DialogInterface;
import android.os.Bundle;
import android.view.View;
import android.widget.Button;
import android.widget.TextView;

public class MainActivity extends AppCompatActivity {
    TextView textView;

    @Override
    protected void onCreate(Bundle savedInstanceState) {
        super.onCreate(savedInstanceState);
        setContentView(R.layout.activity_main);

        textView = findViewById(R.id.textView);

        Button button = findViewById(R.id.button);

        button.setOnClickListener(new View.OnClickListener(){
            public void onClick(View vew){
                showMessage();
            }
        });
    }

    private void showMessage(){
        AlertDialog.Builder builder = new AlertDialog.Builder(this);
        builder.setTitle("안내");
        builder.setMessage("종료하시겠습니까?");
        builder.setIcon(android.R.drawable.ic_dialog_alert);

        builder.setPositiveButton("예", new DialogInterface.OnClickListener() {
            @Override
            public void onClick(DialogInterface dialog, int which) {
                String message = "예 버튼이 눌렸습니다.";
                textView.setText(message);
            }
        });

        builder.setNeutralButton("취소", new DialogInterface.OnClickListener() {
            @Override
            public void onClick(DialogInterface dialog, int which) {
                    String message = "취소 버튼이 눌렸습니다.";
                    textView.setText(message);
                }
        });

        builder.setNegativeButton("아니오", new DialogInterface.OnClickListener() {
            @Override
            public void onClick(DialogInterface dialog, int which) {
                String message = "아니오 버튼이 눌렸습니다.";
                textView.setText(message);
            }
        });

        AlertDialog dialog = builder.create();
        dialog.show();
    }
}
*코드 설명
AlertDialog 클래스는 대화상자에 관한 클래스이다.
-button Onclick 관련 코드
Button button = findViewById(R.id.button);

        button.setOnClickListener(new View.OnClickListener(){
            public void onClick(View vew){
                showMessage();
            }
지금까지 사용했던 button의 onClick 속성을 이용해 onButton1Clicked 말고도,
Java 코드에서 직접 OnClickListener 클래스를 사용해 버튼이 클릭 될 때 showMessage() 이벤트를 발생하도록 설정해주었다.
-showMessage();
AlertDialog.Builder builder = new AlertDialog.Builder(this);
        builder.setTitle("안내");
        builder.setMessage("종료하시겠습니까?");
        builder.setIcon(android.R.drawable.ic_dialog_alert);
대화상자의 title과 message, icon을 설정해주었다.
-showMessage - builder.setPositiveButton
builder.setPositiveButton("예", new DialogInterface.OnClickListener() {
            @Override
            public void onClick(DialogInterface dialog, int which) {
                String message = "예 버튼이 눌렸습니다.";
                textView.setText(message);
            }
        });
대화 상자에 예 버튼을 추가하고 예 버튼이 클릭 하면 텍스트뷰의 메세지가 변경되도록 설정했다.
이와 같이
취소 버튼(builder.setNeutralButton("취소", new DialogInterface.OnClickListener())
아니오 버튼(builder.setNegativeButton("아니오", new DialogInterface.OnClickListener())을 추가해 주었다.
-대화상자 객체 생성 후 보여주기
AlertDialog dialog = builder.create();
        dialog.show();
AlertDialog를 입력하면 글자가 빨간색으로 표시되며 Alt+Enter를 입력하라 하는데, 클래스를 찾을 수 없거나, 클래스가 여러개 뜨는 경우에 표시된다.

Alt+Enter를 누르면 두개의 AlertDialog 클래스가 뜨는데, 여기서는 android.compat.app의 AlertDialog를 선택하자.
어플을 실행시켜보면 대화상자가 표시되고, 각각의 버튼을 누르면 대화상자가 닫히면서 텍스트뷰의 메세지에 결과가 표시된 것을 확인할 수 있다.


## 이 글은 Do it 안드로이드 앱 프로그래밍을 참고해서 작성되었습니다.
도서에는 더 자세하고 알기 쉽게 설명이 되어 있어 도서를 참고하면서 공부하는 것을 추천드립니다.
도서 정보 : http://www.yes24.com/Product/Goods/15789466
www.yes24.com
'안드로이드 스튜디오 > Do it 안드로이드 스튜디오' 카테고리의 다른 글
| [안드로이드 스튜디오 예제 #2] 시크바와 프로그레스바 보여주기 (0) | 2020.05.24 |
|---|---|
| [안드로이드 스튜디오 강좌 #17] 프로그레스바 사용하기 (0) | 2020.05.23 |
| [안드로이드 스튜디오 강좌 #16] 토스트, 스낵바, 대화상자 - 토스트(Toast) (0) | 2020.05.20 |
| [안드로이드 스튜디오 강좌 #15] 이벤트 처리 이해하기 - 단말 방향 전환 이벤트 처리 (0) | 2020.05.19 |
| [안드로이드 스튜디오 강좌 #15] 이벤트 처리 이해하기 - 제스처 이벤트 처리하기 / 키이벤트처리하기 (0) | 2020.05.16 |


