
JLOG
[안드로이드 스튜디오 예제 #2] 시크바와 프로그레스바 보여주기 본문
목표!
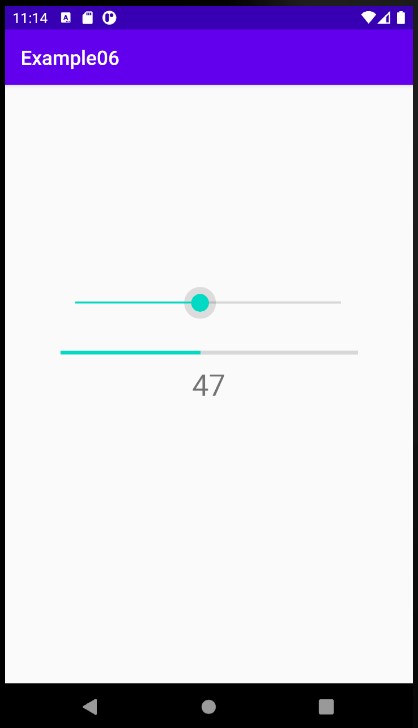
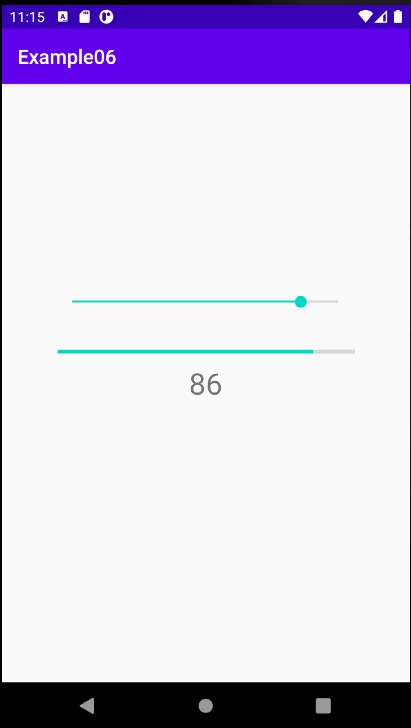
시크바를 조절하면 해당값에 맞게 프로그레스바를 조절하고 textView에 해당 값을 나타내보자
새로운 프로젝트를 열고,
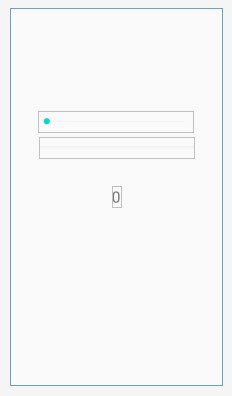
Palette-Widgets에서 ProgressBar(Horizontal)과 SeekBar를 추가해주고 위치를 설정해주자, max 값을 모두 100으로 설정해주자.
그리고 textView의 textSize를 30sp로 설정하고 text를 '0'으로 설정하자.
<?xml version="1.0" encoding="utf-8"?>
<androidx.constraintlayout.widget.ConstraintLayout xmlns:android="http://schemas.android.com/apk/res/android"
    xmlns:app="http://schemas.android.com/apk/res-auto"
    xmlns:tools="http://schemas.android.com/tools"
    android:layout_width="match_parent"
    android:layout_height="match_parent"
    tools:context=".MainActivity">

    <SeekBar
        android:id="@+id/seekBar"
        android:layout_width="300sp"
        android:layout_height="40sp"
        android:layout_marginTop="200dp"
        android:max='100'
        app:layout_constraintBottom_toTopOf="@+id/progressBar"
        app:layout_constraintEnd_toEndOf="parent"
        app:layout_constraintHorizontal_bias="0.495"
        app:layout_constraintStart_toStartOf="parent"
        app:layout_constraintTop_toTopOf="parent"
        app:layout_constraintVertical_bias="1.0" />

    <ProgressBar
        android:id="@+id/progressBar"
        style="?android:attr/progressBarStyleHorizontal"
        android:layout_width="300sp"
        android:layout_height="40sp"
        android:layout_marginTop="10dp"
        android:layout_marginEnd="55dp"
        android:layout_marginRight="55dp"
        android:max='100'
        app:layout_constraintEnd_toEndOf="parent"
        app:layout_constraintTop_toBottomOf="@+id/seekBar" />

    <TextView
        android:id="@+id/textView"
        android:layout_width="wrap_content"
        android:layout_height="wrap_content"
        android:text="0"
        android:textSize="30sp"
        app:layout_constraintBottom_toBottomOf="parent"
        app:layout_constraintEnd_toEndOf="parent"
        app:layout_constraintStart_toStartOf="parent"
        app:layout_constraintTop_toTopOf="parent" />
</androidx.constraintlayout.widget.ConstraintLayout>
Java 코드에 seekBar 값이 변경 될 때 마다 OnSeekBarChangeListener를 이용해서 이벤트를 처리해주자.
MainActivty.java 코드
package org.techtowm.example06;

import androidx.appcompat.app.AppCompatActivity;

import android.os.Bundle;
import android.widget.ProgressBar;
import android.widget.SeekBar;
import android.widget.TextView;

public class MainActivity extends AppCompatActivity {
    SeekBar seekBar;
    ProgressBar progressBar;
    TextView textview;

    @Override
    protected void onCreate(Bundle savedInstanceState) {
        super.onCreate(savedInstanceState);
        setContentView(R.layout.activity_main);

        seekBar = findViewById(R.id.seekBar);
        progressBar = findViewById(R.id.progressBar);
        textview = findViewById(R.id.textView);


        seekBar.setOnSeekBarChangeListener(new SeekBar.OnSeekBarChangeListener() {
            @Override
            public void onProgressChanged(SeekBar seekBar, int progress, boolean fromUser) {
                progressBar.setProgress(progress);
                textview.setText(String.valueOf(progress));
            }

            @Override
            public void onStartTrackingTouch(SeekBar seekBar) {
            }

            @Override
            public void onStopTrackingTouch(SeekBar seekBar) {

            }
        });
    }
}
seekBar 값이 바뀌었을 때 progress의 진행 값을 설정해주고, textView의 text를 다시 설정해주면 된다.
실행시켜서 확인해보면, 시크바를 조절할 때마다 프로그래스 바의 상태가 바뀌고 현재 상태를 숫자로 보여주는 것을 확인할 수 있다.
'안드로이드 스튜디오 > Do it 안드로이드 스튜디오' 카테고리의 다른 글
| [안드로이드 스튜디오 강좌 #19] 여러 화면 만들고 화면 간 전환하기 (0) | 2020.09.17 |
|---|---|
| [안드로이드 스튜디오 강좌 #18] 레이아웃 인플레이션 이해하기 (0) | 2020.05.26 |
| [안드로이드 스튜디오 강좌 #17] 프로그레스바 사용하기 (0) | 2020.05.23 |
| [안드로이드 스튜디오 강좌 #16] 토스트, 스낵바, 대화상자 - 스낵바, 대화상자 (1) | 2020.05.21 |
| [안드로이드 스튜디오 강좌 #16] 토스트, 스낵바, 대화상자 - 토스트(Toast) (0) | 2020.05.20 |
'안드로이드 스튜디오/Do it 안드로이드 스튜디오' Related Articles
more


Comments